The "XControl.ACC" Control panel and CPX modules explained
The "XCONTROL.ACC" control panel (Extensible Control Panel) is the new style control panel ACCessory which now relies on so called "CPX modules" (Control Panel Extensions).
(If installed, you'll find it in the "Desk" menu, from the desktop or while using any program).
Xcontrol was designed for TOS 2.06 and might work unreliably with older version of TOS.
This is what Atari has to say about this matter (from the "Xcontrol" readme-file):
XControl is the newest newest version of the Atari control panel. It is designed to take advantage of features only available in the latest (>2.0) versions of the operating system. It is released into distribution with the following notice.
Users who don't have a MegaSTE, TT030, or machine released later must use the shutdown feature of XControl whenever changing resolutions. Shutdown will appear in the options menu of XCONTROL if your version of TOS does not support the necessary features. Failure to use the shutdown option will result in unpredictable behavior of applications executed after a resolution change. Atari Corporation is not responsible for any damage that results from the use or misuse of this program.
|
|
|
- Bypasses the 6 accesory limit by allowing this one accessory to have several functions.
- No need to reboot (restart) the machine as needed when installing new accessories.
- Use those valuable accessory slots for other accessories instead of just necessary computer settings.
- Allows for up to 99 "CPX modules" to be installed (memory permitting).
- CPX modules are loaded/unloaded from memory each time, so as not to take up valuable memory.
- CPX modules can also be installed to be "memory resident" so they're loaded into memory and stay there if necessary.
- Lots of CPX modules available for all sorts of tasks, replacing accessories in many cases.
Control panel setup
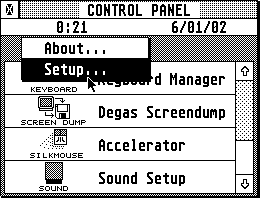
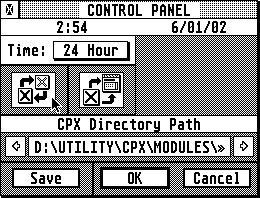
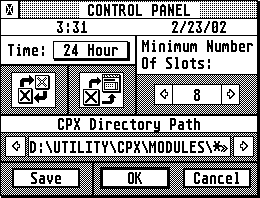
Click on "Options", then on "Setup"...
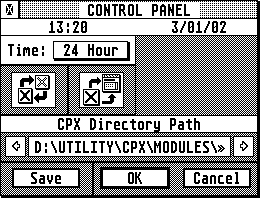
- Click the time display with the mouse, enter the correct time and press <Return> when done.
- Click the date display with the mouse, enter the correct date and press <Return> when done.
- You can choose between 12 and 24 hour time formats.
- The date and time formats are determined by which version of the "XCONTROL.ACC" control panel you have (USA or European versions).
- If the file-path to where the CPX modules are located is incorrect (or hasn't been set at all), click on it once and select the folder where they are.
- Remember to click on the "Save" button to save the file-path as well as the time format (12 or 24 hour format).
|
|
|
Activating and deactivating CPX modules
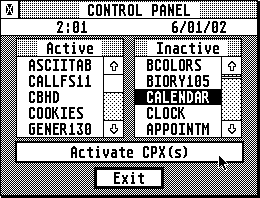
The icon on the left side (in the "Setup" window) allows you to activate/deactivate CPX modules...
| Click on the left icon (as shown here with the mouse-pointer) to activate and/or deactivate CPX modules. |
- Activating CPX modules:
- Click once on the "Inactive" CPX module (right column) you want to use, then click on the "Activate CPX(s)" button below to activate it.
- To activate several CPX modules at once, just hold down the <Shift> button on the keyboard while selecting with the mouse, then press the "Activate CPX(s)" button.
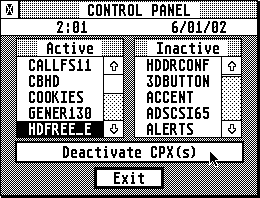
- Deactivating CPX modules:
- Click once on the "Active" CPX module (left column) you want to use, then click on the "Deactivate CPX(s)" button below to activate it.
- To deactivate several CPX modules at once, just hold down the <Shift> button on the keyboard while selecting with the mouse, then press the "Deactivate CPX(s)" button.
- Press the "Exit" button when done.
|
|
|
Reloading CPX modules
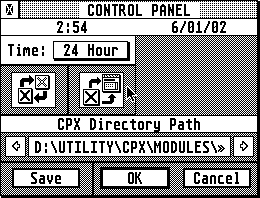
The icon on the right side (in the "Setup" window) allows you to reload your new combination of CPX modules (this will load the newly selected modules and unload those you've deselected).
An exception from this rule is when you've deselected a memory-resident CPX module. These will stay in memory until you reboot (restart) or turn the computer off.
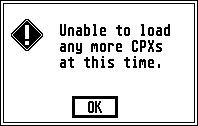
| Click on the icon near the mouse-pointer in this illustration to load/reload the CPX modules you've selected. | Sometimes you will see this error message. Try rebooting (restarting) the computer as this usually loads all your installed CPX modules (memory permitting). |
- If trying to load/reload a large amount of CPX modules you will sometimes get an error message saying that they can't all be loaded into memory.
The reason has to do with how many "memory-slots" Xcontrol makes available when booting.
Solve the problem as follows:- Enable (activate) all the CPX modules you wish to use.
- Reboot (restart) the computer.
- This should make all the CPX modules you've chosen available.
CPX information and other features
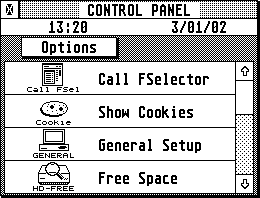
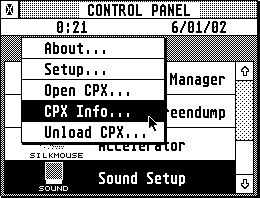
The main window for the control panel showing the CPX modules...
- Select a CPX module (by clicking on it once), then go to the "Options" menu.
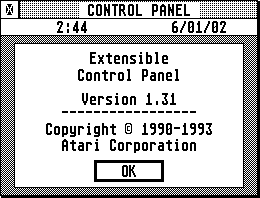
- About... : Shows the information window for the control panel accessory.
- Setup... : The "Setup" window as previously explained.
- Open CPX... : Open/use the selected CPX module. Same effect as double-clicking it.
- CPX Info... : Shows information about the selected CPX module (file name, version, ID, memory resident or not).
- Unload CPX... : Deactivate the selected CPX module.
Minimum number of CPX slots
In version 1.0 of "XCONTROL.ACC" there was an option for setting the minimum number of slots....
Atari explains this feature as follows (taken from the "Xcontrol" readme-file):
Minimum number of slots
CPXs are stored in an external memory device (hard disk or floppy disk). During startup or reloading, only basic information about each active CPX (such as the CPX's name and icon) is loaded into RAM. When you actually open an active CPX, the bulk of the file is then loaded into RAM so you can use the CPX. When you close the CPX, the file is erased from RAM until the next time you open it.
Note: CPXs with Resident status do not follow the above pattern, but are copied into RAM at startup time.
The computer has to know how much RAM to reserve for CPX basic information. When you set the Minimum Number of Slots, you are telling the computer to reserve enough RAM to be able to store basic information for that number of CPXs. If the number of active CPXs at startup time exceeds the Minimum Number of Slots, the computer will reserve enough RAM for that number of CPXs. You can select from 5 to 99 slots.
To change the Minimum Number of Slots, follow these steps:
- Open the Control Panel. Select Setup from the Options menu.
- Use the scroll arrows to display the desired number of slots. Select OK or Save.
This user-selectable option was removed in later versions of Xcontrol as it was found to be both confusing and unnecessary. Instead (with version 1.31 of Xcontrol) it now works as follows (taken from notes accompanying the USA version of Xcontrol 1.31):
- All CPXs will be allocated dynamically unless specified to be resident. Previously, the INF file specified if all CPXs were to be allocated dynamically, OR, to allocate at boot time, the largest amount of memory required by the largest CPX.
- The option to set the minimum number of slots has been removed. This option has caused a lot of misunderstanding. From now on, the number of slots allocated will be 1-1/2 times the number of active CPXs. If there are no active CPXs, 5 slots will be allocated. This means that at least 5 CPXs can be "Reloaded" without having to reboot the system.
- The Control Panel now uses malloc() instead of Malloc(). Under MultiTOS, Malloc() allocates a minimum of 8K which is not suitable for our purposes.
Making CPX modules memory-resident
CPX modules are usually loaded into memory each time they're opened (double-clicked), and unloaded from memory when you close them. This saves a lot of valuable memory which you can use for other things.
But there are situations where you might want to keep (all or some of them) in memory all the time:
- If you don't have a hard disk, but instead rely on a "boot-disk" you will find it cumbersome and slow to read from that disk (possible also needing to exchange disks with whatever's currently in the drive) each time you need to access the control panel and use a CPX module. (a boot-disk can contain things like the control panel ("XCONTROL.ACC"), the CPX modules, the desktop setup file ("NEWDESK.INF") and possibly even additional icons ("DESKICON.RSC") as well as any other necessary ACCessories and AUTO programs. This disk is inserted in the floppy disk drive each time the computer is turned on or restarted).
- Certain programs (especially old software) reserve all available memory to themselves. When you try to open a CPX module you'll get an error message saying that no memory is available in order to open it. In worst case the computer might even crash!
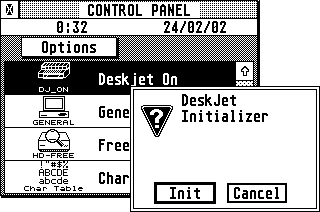
An example of this is the MIDI sequencer "Notator SL". When it's time to use the printer you might need to reset it using the "DJ-on" (Deskjet On) CPX module.
To make this possible at any time (also within "Notator SL") you could make it "memory-resident"
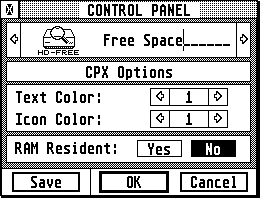
To make CPX modules memory-resident you can use the "Configure" CPX-module...
| The "Configure" CPX module allows you to make any CPX module memory-resident. |
The "Deskjet on" CPX module allows you to reset Hewlett Packard printers (and possibly others as well) which otherwise have to be turned on before the computer. Some programs steal all available memory so you can't access it without exiting that program first (which you probably don't want to waste time doing when you're ready to print). |
The CPX modules...
There are lots of CPX modules available. Some come as part of other programs, to allow the user to change certain settings, others come on their own as an enhancement to the computer.
Below follows brief descriptions of the CPX modules that come as standard from Atari.
(Please note that some of these modules can cause problems with other programs as they were written without following standard programming guidelines among other things.
They should be removed, or replaced with better alternatives if possible.
This applies to certain control-panel replacements and many programs. Refer to the user manuals for more information if available, or remove the CPX modules one by one until you find out which one is causing the trouble).
General (GENERAL.CPX)
|
|
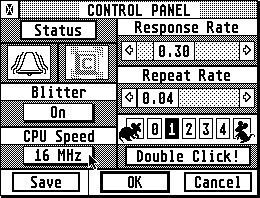
On a Mega STe an additional setting for the processor speed becomes available. |
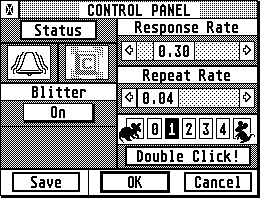
- Turn on/off keyboard click sound.
- Turn on/off alert bell.
- Turn on/off Blitter chip (if available).
- Adjust keyboard repeat rate and delay before repeat.
(turn on the keyboard click sound when adjusting the repeat rate/delay and press the <space> bar.
By listening to the key-click rate you'll get an impression of your settings. You can turn the key-click off afterwards in case you usually don't like having it on). - Adjust mouse double-click speed.
- Set 8/16MHz speed and cache on/off on a Mega STe
Sound (SOUND.CPX)
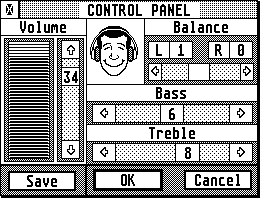
- Only suitable for Atari ST computers with DMA (Direct Memory Access) digital audio (STe, Mega STe etc.)
- Set audio level.
- Set stereo balance (left/right).
- Set tone (bass/treble) levels.
Mouse-accelerator (MACCEL.CPX)
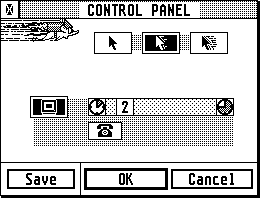
The "Maccel" (Mouse accelerator) CPX module.
- Two functions: mouse-accelerator and screen-saver.
- Improves the response of a "slow" mouse (e.g. the original Atari mouse).
- The screen saver inverts/blanks the monitor display if the computer hasn't been used for a while. This prevents screen "burn-in".
Note: This CPX-module has been known to cause problems in certain cases and should be disabled if you notice any problems.
A better alternative is Silkmouse which has the same functionality and is more compatible.
Configure (CONFIG.CPX)
- Allows you to change the colour of any CPX module's icon and/or text (colours are obviously only available in low or medium resolution modes).
- Lets you configure any CPX module to become memory resident (stays in memory all the time).
Note: This CPX-module has been known to cause problems in certain cases and should be disabled if you notice any problems.
The readme-file for "Zcontrol" mentions this module as one which can crash the control panel.
If it won't work, revert back to "Xcontrol" or enable it only when you need to configure a CPX module, then deinstall it again.
Colour (COLOR.CPX)
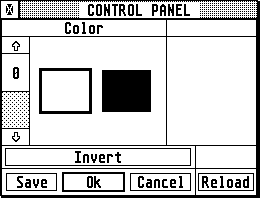
The "Color" CPX module lets you set the computer's colours.
- Set the colour palette when in medium on low resolution.
- Invert the screen (black becomes white and vice-versa) in ST-high (black/white) mode.
Note: This CPX-module has been known to cause problems in certain cases and should be disabled if you notice any problems.
Window colour (WINCOLOR.CPX)
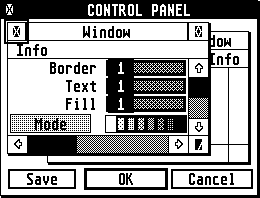
The "Wincolor" CPX module lets you change the window colours/patterns.
- Change the patterns (or colours when in medium/low resolution modes) of the various window-elements.
- Foreground (active) and background (inactive) windows can be separately configured.
- Your own custom setup can be saved
- 10 pre-defined setups are available.
Note: This CPX-module has been known to cause problems in certain cases and should be disabled if you notice any problems.
Printer (PRINTER.CPX)
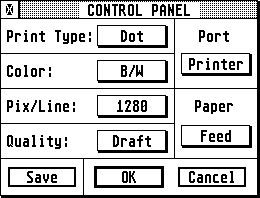
The "Printer" CPX module is used to set the printer's options.
- Set the print quality, colour or black/white etc.
- Set the output port (serial or parallel) depending on printer.
- Settings in this CPX module apply to the print options from the desktop.
("Print" when double-clicking a text-file (or selecting "Open" from the "File" menu) or
"Print Screen" from the "Options" menu).
Note: The above CPX module is pretty basic and old as it only supports either dot-matrix or daisy-wheel printers. There's no option for modern laser or inkjet printers. However, if your printer is Epson compatible it should work.
Read some of my tips on printing to learn some neat tricks and more detailed information about the TOS 2.06 desktop print options.
Modem (MODEM.CPX)
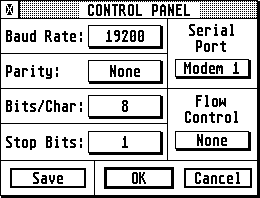
The "Modem" CPX module is used to set the modem options.
- Set the baud-rate, parity etc.
- Set the output port (if several ports are available as with the Mega STe).
Note: All TOS versions including 2.06 suffer from poor modem performance. This applies especially to high speed modems (though "high speed" in this case is maximum 19200 baud which translates into 14400 baud modems being the fastest you can use).
You should disable MODEM.CPX and put SERIAL.CPX in its place. For better performance you should also install the required parts of "HSmodem" (in the AUTO folder) which gives much better modem performance and additionally supports faster modems (actually, with a small hardware modification such as "RSVE" or similar, together with the HSmodem software you can achieve speeds up to 38400 baud (or higher in some cases) with an Atari ST) making it possible to use modern modems. HSmodem also improves modem performance reliability without any speed-increase added hardware.
Control panel alternatives
In addition to the original "XCONTROL.ACC" control panel from Atari, there are now several improved replacements available:
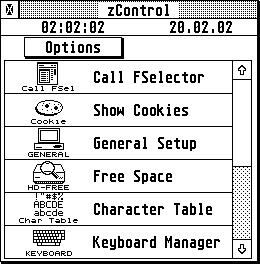
- Zontrol
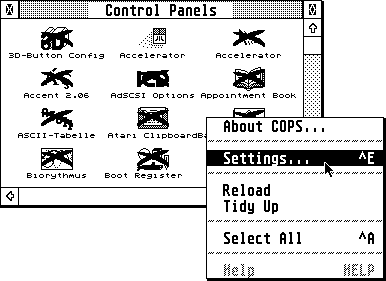
- COPS
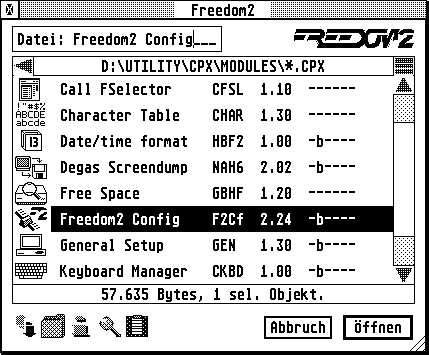
- Freedom 2 (a file selector replacement which also handles CPX modules)
Out of these three I personally prefer "Zcontrol" as I find it easy to use and causes no problems (actually I've heard that it does indeed contain a few bugs, so if it doesn't work for you, go back to the original "Xcontrol"). I'm pretty happy with the original "Xcontrol" as well, but "Zcontrol" has some nice features like being able to display more modules at once and a nicer activate/deactivate window (I find the scroll bar a bit too small to my liking in "Xcontrol" when there are many modules to choose from).
However, use whatever works for you as this is largely a matter of taste and need of features.
| The "COPS" control panel will show all CPX modules available whether they are enabled or disabled. On a standard ST you might find that you'll have to wait a little while each time you start the computer so all the icons can be displayed. On the bright side you can simply double-click a disabled CPX module and use it instead of having to enable/reload it first. |
"Zcontrol" looks a lot like the original, but has a few improvements over Xcontrol like the ability to show more than 4 modules at once. |
| "Freedom 2" is actually a replacement for the Atari file-selector (which is shown every time you open or save a file), but as it handles CPX modules it replaces "XCONTROL.ACC" as well. |

