Additional tips & tricks
As you've noticed, this user-guide is full of practical tips and tricks related to the various topics discussed. Here are a few more....
Save position/size of desktop windows
You probably know that TOS 2.06 saves the size and position of any open window on the desktop (it also saves the position of a window's scroll-bar), but did you know that it also saves the same information for closed windows?!
Why is this of interest? You probably don't want to clutter up your desktop with several open windows all the time (as you won't be able to access any icons elsewhere on the desktop)... but when you do open a window you don't want to waste time resizing/repositioning them either, so.... how about windows opening like you want them, when you need them?
This is what you do:
- Double-click on one of the drive icons in order to open a window (the contents don't matter -all we need is an open window)
- Adjust the size and position of the window to your liking (keep in mind that we need room for several other windows (up to 7 if needed).
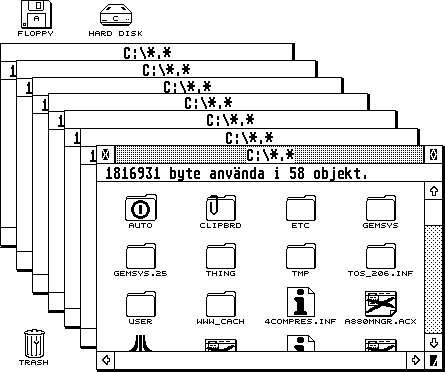
- Open up another window (again, any window will do) and position/size it as you want. The best solution is probably to "stack" it on top of that first window, but leaving room to access it even if the other window is active (see illustration above).
Repeat this as many times as you want window positions to be saved (up to 7). - Close the windows in reverse order (i.e. the close the last opened window first).
The sequence of closing the windows is important if you want the windows to stack up as you started doing. If you make any of the windows active in a different sequence, they will stack in a different order as well. - Save the desktop ( "Save Desktop" in the "Options" menu).
- You will now have an uncluttered desktop, but each time you open a window you'll have the placement exactly as you wish!
- Test your setup: double-click on a drive-icon for up to 7 times, opening 7 separate windows. If the sequence of window placement is wrong, simply make the one you want to be last active, then close it. Repeat this with the next-last window and so on, then save the desktop again.
- Note that the windows aren't always saved exactly where you place them and with the exact same size. This is because TOS "snaps" them into certain positions, but as close as possible to what you've done. If the windows aren't placed as you want them, try moving them a little bit in another direction, then save the desktop. To see if you've got it right, read the desktop setup file.
If you're not happy with it, try adjusting a little more, save the desktop, then read the desktop setup file again.
Creating a boot floppy disk
A hard disk is practical in many ways...
- Can store a large amount of files.
- All files are easily accessible (no need to look for and swap disks).
- Easy to create a computer setup where different programs work together (i.e. a graphic viewer is used to view files, a text editor opens up text files etc.)
- Handy for loading lots of ACCessories, AUTO programs, CPX modules etc.
- Fast!
Even though hard disks have dropped down considerably in price since the mid 80s when the Atari ST came about, not every Atari ST user has one, for a variety of reasons:
- Haven't bothered
- Don't know how to connect a hard drive to the Atari ST
- Misconceptions about the cost
Actually there are several solutions around which should fit almost any wallet (ask in the Atari ST newsgroups or contact an Atari dealer for more information), but for those who still don't have a hard disk, here's a neat trick.... create a boot-disk!
A boot disk (as the name implies) is a floppy disk you use each time you boot (start up) the computer and loads some of the essential programs you want your computer to have. The boot disk can for example contain the following (as long as there's room for everything):
- Programs contained in the AUTO folder.
- ACCessories (including the control panel).
- CPX modules (for use with the control panel).
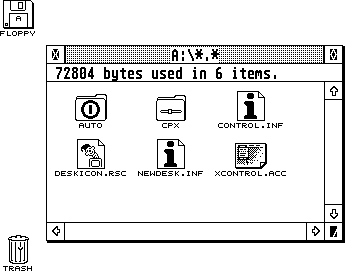
- Replacement icons ("DESKICON.RSC").
- The desktop setup file ("NEWDESK.INF").
- The clipboard (for storing temporary work files).
If you have a hard disk, a boot floppy disk is handy for emergency situations where you've got problems with the hard disk (e.g. damaged hard disk driver software). The floppy disk could contain the hard disk driver in its AUTO folder (for automatic "mounting" of the hard disk when loading) or elsewhere on the disk (for manually running the hard disk driver, mounting the hard disk drive). Read the notes on mounting a hard disk drive from a floppy disk for more information)
If using the GEM clipboard, be sure to leave the floppy disk unprotected (so you can write to it).
The CLIPBRD folder is created by the computer the first time you use it (e.g. copy/paste within a program that supports the GEM clipboard. From then on it uses this folder to store temporary items that you may work with).
(Refer to the keyboard shortcuts to find out how to boot from a floppy disk).
Installing a replacement file-viewer ("Guck")
If you double-click on a text file (well, actually anything which isn't a program, and hasn't already been defined as "document type" in the installation of a program) ....you've noticed that the following dialog comes up:
You will be able to read (or print) the contents of an ASCII text-file this way, but with some limitations:
- You're not able to scroll backwards. If you've missed something you have to quit the document, then read it all over again.
- You're limited to only the dot-matrix or daisy-wheel printer support which TOS 2.06 gives when printing.
- If a text-file has been saved with UNIX type line-endings (LF as opposed to CR/LF on the Atari ST or PC platform) the file will be virtually unreadable and has to be converted first, or read using a text-editor.
- You can't view images, only text.
- Reading "1st Word" (or "1st Word plus") documents displayes them with all the formatting codes in addition to the actual readable text.
You can resolve all the above limitations and more by installing an alternative file-viewer such as "Guck", which is a small TTP program, easily installable using the installer program that comes with it. From now on, when double-clicking a text file, "Guck" will be used to display it. You can also view the most common Atari ST graphic formats such as ".IMG" (however, for formats such as ".GIF" and ".JPG" you will need to use a dedicated graphic viewer such as "GrafTool").
Printing within TOS 2.06
Most programs that allow for printing have their own printer drivers and setup options which don't have anything to do with the TOS 2.06 desktop, so whatever you want to print from a certain program has to be set up there. But it's still possible to do some (limited) printing from the desktop itself. The settings for the printer are accessible by going to the "printer" CPX-module.
Unfortunately, the options there are quite outdated for today's printers as the printers used back in the days when the Atari ST was designed were dot-matrix printers.
If your printer is Epson compatible you can (hopefully, but no guarantees) do the following (make sure the above settings are set to "Dot Matrix" and not "Daisy wheel") from the desktop:
- Press <Alternate><Help>.
This will do a graphic printout of the desktop exactly as you see it (with icons, any open windows etc.).
(Note: some screen-grabber type programs if installed (such as N_Althelp) replace this keyboard shortcut with their own functions, so the screen is instead saved as a picture file). - Press the > key.
This will do a text-listing printout of the contents of the top (active) window on the desktop. It doesn't matter if you've set the desktop view setting to text or icon. The printout will be more or less the same as what you see when you view a window's contents as "text".
The files/folders will be printed in the same order as you've set the desktop to display them (the [[The "View" menu#Sort by [Name/Date/Size/Type/No sort]|sort by ...]] menu). Here's an example of what you'd end up with on paper:
	D:\*.*

	ELECTRNC		13-04-99	07:12 pm
	GAMES			11-07-92	12:39 am
	ICONS			02-02-02	02:02 am
	INTERNET		01-12-98	11:21 pm
	MIDI			27-06-98	09:17 pm
	SYSTEM			04-06-98	04:58 pm
	TEXTEDIT		20-09-01	08:43 pm
	TOOLS			01-03-02	02:15 am

	0 bytes used in 8 items.
- Double-click (or open) a text file (actually any non-program file, or any file which hasn't had a program recognize it using the install menu).
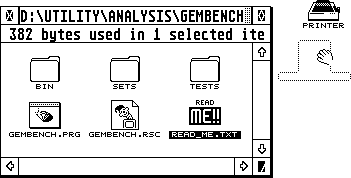
...and you will get a choice between viewing the file or printing it. (if you have an alternative file-viewer such as #guck Guck installed, which supports printing, that viewer may have better options and wider support for modern printers than the TOS 2.06 desktop has). - Add an icon for the printer on the desktop, then drag a text file over to that icon. The text file will be printed.
As the desktop printing options of TOS 2.06 are pretty limited (and don't support all available printers), here are some additional tips:
- Get hold of Idealist which is a very versatile text-print utility program. It allows you to print plain ASCII, 1st Word and RTF (Rich Text Format) files with lots of options such as user-definable columns, margins, different fonts/sizes, skip pages etc. and has drivers for a variety of printers. This is much better than using the print options of the TOS 2.06 desktop! Place the Idealist program on the desktop. From then on you can drag and text file to its icon and print the file.
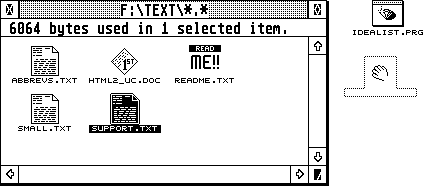
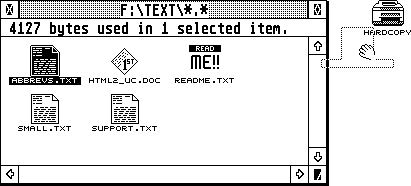
- To make it look even better you can single-click (to select) the Idealist program icon, then change the icon as well as the name (e.g. "Printer", "Hardcopy" etc.)...
- For printing graphics or other text files, use dedicated programs for those tasks. Actually you'll most likely find that you seldom need the printer options that the TOS 2.06 desktop gives you anyway.
- Check around to see if there's support for your specific printer. There should be both AUTO programs and CPX modules to accomodate for several printers, making the most out of them (which the standard printer CPX module won't). Check the various Atari ST download sites on the Internet, ask in newsgroups etc.
Temporarily changing a program's default directory
When a program is installed you get to choose if it should default to its own location or the currently active desktop window. Programs which haven't been installed follow the same rules, but refer to the settings in the desktop configuration menu.
(The default directory setting tells a program where to start looking for files. This could be in a situation where you drag a file to its icon, or where you double-click a file with an extension that is recognized by an installed program).
When the default directory is set to "Top window" the program starts looking inside the active window on the desktop. You simply can't double-click or drag a file anywhere without first activating its window (i.e. by clicking on the window once, if it isn't already active). But here's a neat little trick which will allow you to temporarily use any other window as a program's default path!
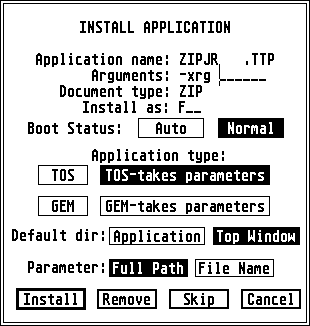
Let's say that we've installed "ZIPJR.TTP" to handle all files ending with ".ZIP" as shown below.
Whenever a .ZIP file is double-clicked, ZIPJR.TTP will decompress it, and the contents will end up in the same directory as the .ZIP file itself.
.... in this particular case however we want the contents to be extracted to a different directory, but we're in a hurry and don't have time to first move the file and handle the file in that new location...
- Make sure that ZIPJR.TTP is installed with the default directory/parameter settings as shown in the illustration above. This trick won't work otherwise.
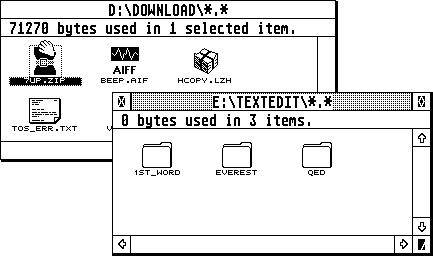
Alternatively, the desktop configuration menu has to be set the same way. - Open the directory window where the .ZIP file is located (D:\DOWNLOAD\ in this example).
- Open the directory window where you want the contents of this .ZIP file to end up (E:\TEXTEDIT\ in this example).
- Make the target window (E:\TEXTEDIT\) active by clicking on it once.
Depending on the size/position of the two windows, the top window may be partly or completely blocking the one where the .ZIP file is found.
(We need to see the .ZIP file icon even though it's not the active window. Move or resize your windows until this is possible). - Again, make sure that the target window (E:\TEXTEDIT\) is active.
- Click (and hold) the right mouse-button.
- Keep holding down the right mouse-button, then double-click on the .ZIP file with the left mouse-button.
- The .ZIP file will become decompressed and the contents will end up in the active window (which isn't the one where the .ZIP file is found)!
This feature was actually a bug in earlier TOS versions, but when the programmers at Atari found out about it they decided to leave it alone and officially stated that it would be kept for future versions of TOS.
If only all other software bugs would give such pleasant side-effects!
Updating a program's path automatically
TOS has an undocumented ability to automatically update the paths of installed programs whenever they're moved!
Let's say you've installed the .ZIP compression/decompression program "STzip" which will decompress any .ZIP file when double-clicked (if using the appropriate argument settings).
Next we move (not copy) this program (ZIPJR.TTP in this case) to another location on the hard disk or floppy disk. We'd assume this would involve having to reinstall the program all over again to provide for the new path, but not so!
.... as soon as we move any (pre-installed) program this information is automatically updated and saved to the NEWDESK.INF file. If you've made any other changes to the desktop in the meantime (added/removed icons etc.) this information will also be saved.
Information is automatically updated and saved...
- Whenever an installed program is renamed (e.g. ZIP.TTP replacing the original name of ZIPJR.TTP)
- Whenever an installed program is moved to another location.
Information is NOT automatically updated and saved...
- If the folder of the installed program is renamed.
- If the installed program is copied to another location and the original is deleted.
