Installation and setup examples
Lots of neat things can be done with TOS 2.06, but some of the installation parameters and other ways of doing it can be a little tricky. I will try to explain a few things here which can be put to practical use in a variety of ways...
- Compressed files (e.g. ".ZIP" or ".LZH") can be decompressed by simply double-clicking them.
- Picture files (e.g. ".GIF", ".JPG" or ".IMG" etc.) when double-clicked will have a graphic viewer start, then load the picture for you to see.
- Sound files (e.g. ".WAV", ".AIF" or ".SND" etc.) when double-clicked will have a sample-file player start, then play the sound file for you to hear.
- A HTML file when double-clicked will have the web-browser start, then show that document.
- A word-processor document (e.g. ".PAP" for the "Papyrus"" word-processor) when double-clicked can start the word-processor, then display the document which you can read or continue working with.
Installing an application to handle a single type of file
TOS 2.06 allows you to define a single file-type for each program installed (we will later discuss how to modify the setup file to allow for several files to be handled).
Let's say we want all HTML files (named ".HTM" on the Atari ST because of the 8+3 filename limitation) to be opened up in the "CAB" (Crystal Atari Browser) web-browser when double-clicked. Just following these simple steps:
- Locate the program which is "CAB.APP" in this case and click it once to select it.
- Go to the "Options" menu, then select "Install Application".
- Enter "HTM" where it says "Document type".
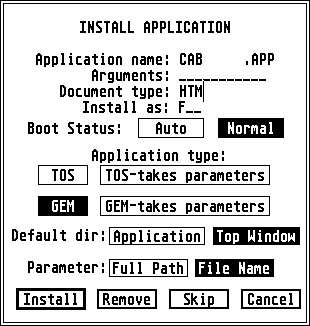
- Press the "Install" button to complete the installation.
- Save the changes by going to "Save Desktop" in the "Options" menu.
Installing an application to handle several file-types
The "Install application" menu only allows you to define one file-type for each program which isn't very useful considering that a graphic viewer can handle several formats (such as ".GIF", ".JPG", ".IMG", ".IFF", ".BMP", ".PCX", ".PI3" etc.).
The same goes for audio (sound)-file players and decompression programs as well, to mention a couple more among the many applications that are available out there.
As explained in the Atari TOS desktop survival kit, you can bypass this limitation in TOS 2.06 by manually (and carefully!) editing the "NEWDESK.INF" file which is where all this information is stored.
Let's follow the steps of making the image-viewer "GrafTool" handle .IMG, .GIF and .JPG graphic formats. After a successful installation you will be able to simply double-click on an image file of the above formats and GrafTool will display them!
The following examples are shown for GrafTool, but you can apply the same method for any other program which you want to handle multiple file-types....
Step-1: installing "GrafTool"
- Install "GrafTool" the usual way...
- Click on the program once (to select it), then go to the "Options" menu and choose "Install application").
- Click on the "GrafTool" program once (to select it), then go to "Install Application" in the "Options" menu,
- In the Document Type area, enter the following: IMG (as we want to make it handle .IMG files to begin with).
- Leave the rest of the settings alone (some programs however need the Default Dir and Parameter settings changed in order to work properly)
(read a more detailed explanation of the path and parameter settings to find out exactly how they're used). - Press the "Install" button.
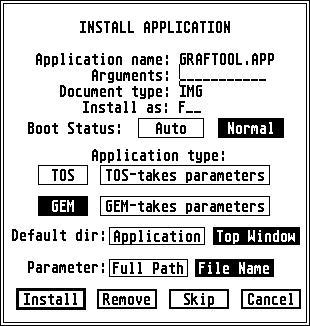
- If you have some .IMG files available, try it out by double-clicking one of these files. GrafTool should start up and display the file after a little while.
- If it works like it should, save the desktop.
Step-2: adding multiple file-types
Now that we've done the actual installation of the program we can continue by adding several types of files for it to handle.
As you can see, the "Install application" window doesn't allow for any more than one type of file to be handled by each program, so we have to bypass this limitation by manually editing the "NEWDESK.INF" file, which is where all information about program installations, icons, window placements and other things related to TOS are stored.
What we're about to do here is a little more complicated than pointing and clicking with the mouse, but by carefully following this guide even novices should be able to handle it.
- Locate "NEWDESK.INF". If you have a hard disk you'll find it in the root (not inside any folder) of the boot (startup) drive (which is most likely drive C).
If you don't have a hard disk you'll probably find it on your boot floppy disk - Make a backup copy of this file. Rename the backup to something like "NEWDESK.BAK" or whatever you like. In case something goes wrong you can always delete the current "NEWDESK.INF" (non-working/messed up) file and replace it with the (working) backup and try to do the editing again.
- You will need an ASCII text editor such as "Everest" or "7up" which are two popular text editors among many. You may prefer another editor which is fine as long as it doesn't remove trailing spaces, change line-ending characters, wrap text or otherwise mess up the file in any way.
- Open "NEWDESK.INF" with your text editor and scroll down until you find the line we're looking for which concerns GrafTool. It should look a little something like this (don't worry about the file-path as its location on my hard disk is probably different from yours)....
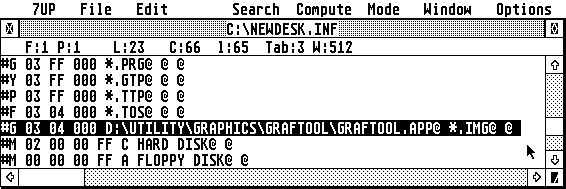
(Note: if you've placed an icon of GrafTool on the desktop the above file will also include that information. This is not the part we want to change. Look at the end of the line which in this case contains *.IMG to indicate that it handles .IMG files). - Next we're going to copy that whole line two times (since we want to add two new file-types: .JPG and .GIF)
Assuming you know the basics of using a computer and a text editor, copy the whole line which also includes a space at the end. Be sure to drag the mouse at the very end of the line and not just what you see.
Insert the copied line underneath the first one, then again. You should now have 3 identical lines of text. Be careful that you don't edit anything else in the file. Stick to the above.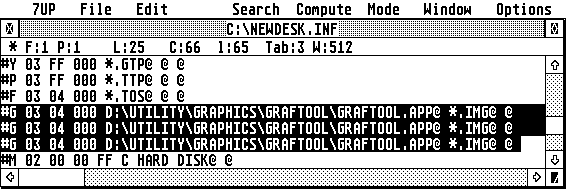
- Now that we have those 3 identical lines defining GrafTool to handle .IMG files we can go ahead and define those 2 extra types of files (.IMG and .JPG)...
Leave the first line alone (because we still want it to handle .IMG files), but move on to the second line. Change *.IMG at the end of the line to *.GIF.
Move on to the third line and change *.IMG to *.JPG. The three lines should now look something like this: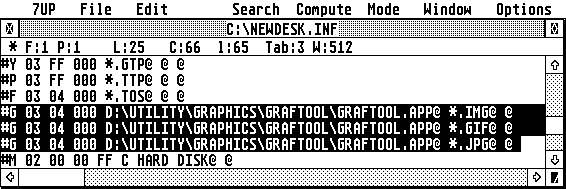
- Save the file within your text-editor, making sure that you haven't touched anything else as this will only give you problems unless you know what you're doing. For more information about the "NEWDESK.INF" file and hacks similar to the above, read the Atari TOS desktop survival kit as this will explain each line of the desktop file in detail.
- Reboot (restart) the computer. This will load the new settings you've just made into memory.
- Try double-clicking .JPG, .GIF and .IMG files. They should all open up and be displayed by GrafTool.
Installation parameters
TOS 2.06 allows you to define several useful parameters which are unfortunately a little complicated to figure out as they're not obvious and haven't been very well documented anywhere.
I've covered all of the settings elsewhere in this user-guide, but three of them are a bit more complicated and need some further explanation. I'll try to shed some light on this and clear up a few details...
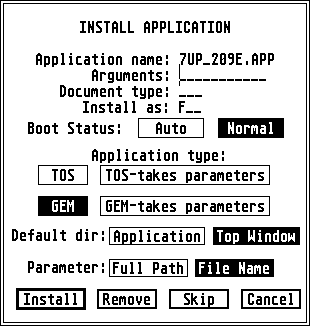
Single-click (to select) a program, then go to the "Options" menu and select "Install Application" which will present you with the following window:
Any program can of course be run by double-clicking it, but by "installing" programs you will gain certain benefits and extra features, such as:
- Whenever a file of a certain type is double-clicked on the desktop, that program is used to open it (e.g. a graphic viewer is used to display a ".IMG" or ".GIF" image file)
- A program can be started by pressing an F-key (function key).
- Certain types of programs can have additional parameters added to perform user-configurable tasks (e.g. ".TTP" type programs accepting UNIX type command line input)
- A program can have its default directory changed (e.g. the currently active window is the one which pops up when opening/saving a file using the file-selector).
- A program can be started automatically as soon as the desktop appears. Useful for programs which you always run whenever you turn on the computer (e.g. replacement desktop programs or situations where you end up using the computer only for one specific program).
Note: it's a common misconception that every program needs to be installed.
Installation only adds specific parameters which might be needed to instruct certain programs on how to behave. Other programs can be used to their full extent without any prior installation.
In the case of programs not being installed, the "Default Directory" and "Parameter" settings (as explained in detail below)
from the "Desktop configuration" menu are used. (note that some programs rely on specific settings here in order to work! Read on....).
Arguments
Programs with ".TTP" (or ".GTP") endings aren't normal Atari ST programs as they don't have graphical menus/windows/mouse control but instead rely on something as old-fashioned as command-line input (remember when you had to type in complicated commands using MSDOS or UNIX?).
Not very user-friendly, and totally a waste of time in this day and age, right? Not necessarily...
- They're compact and effective (adding graphical menus/windows takes up memory and computer resources).
- They're easier to make than normal GEM type programs (a programmer can concentrate fully on the application itself and not the graphical user-interface).
- Cross platform compatibility (many of these programs originate from UNIX environments and wouldn't normally be available for our favourite computer had it not been for the ability to run them in addition to the usual GEM programs!).
- Configurable (using a command-line you can virtually do just about anything with these types of programs. Many of these things can also be done when installed within the TOS 2.06 desktop itself as I will explain here).
- Some programs are only available as .TTP types as there aren't any GEM equivalents available for the specific task.
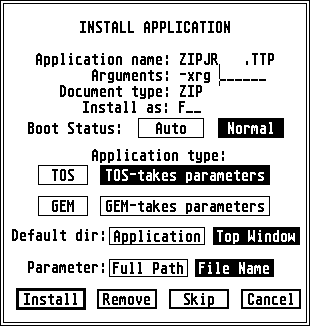
In this example we'll be using "ZIPJR.TTP" to decompress any .ZIP file by simply double-clicking them.
"ZIPJR.TTP" has several parameters/options, and as you can see we've used 3 of them. According to the "STzip" documentation (which also includes "ZIPJR.TTP" among its programs), these parameters do the following:
- x: expand (decompress) the .ZIP file
- r: recursive action (all folders, sub-folders and files contained within will be decompressed).
- g: folder (a new folder will be created for the contents of the decompressed file -this is very useful for situations where the file hasn't been compressed within a folder resulting in files scattered all over the place. But in most situations people have been considerate enough to put the files inside a folder which in this case results in a folder surrounded by a folder which you'll probably want to move out of afterwards. You decide what's most useful!).
IMPORTANT: Please note that there's an empty space at the end of the arguments! If you forget about this it won't work. Also remember to add a "-" at the beginning as this is the usual way a command line option is given.
Translated into what a command-line text input of this would look like (using a command line shell such as "Gemini") with a .ZIP file named "TESTFILE.ZIP":
ZIPJR.TTP -xrg TESTFILE.ZIP
Without the space at the end you'd end up with the following (which of course doesn't make sense and won't work):
ZIPJR.TTP -xrgTESTFILE.ZIP
Other ".TTP" (or ".GTP") programs may use other "arguments" and have other minor differences in order to work, but the principle is the same as in the above example. In addition to reading the documentation you might have to spend a little time experimenting to get it right.
Default directory/Input parameter
Now let's move on to a couple of options determining where files are located (so the program can find its files!).
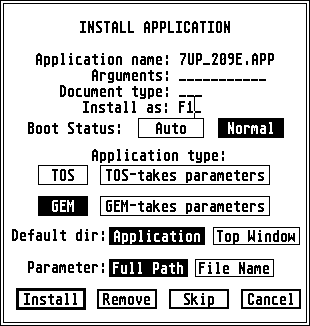
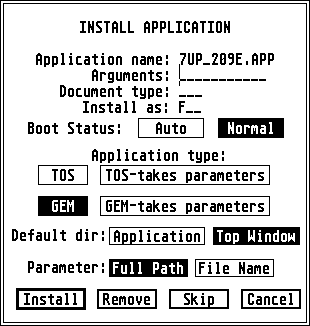
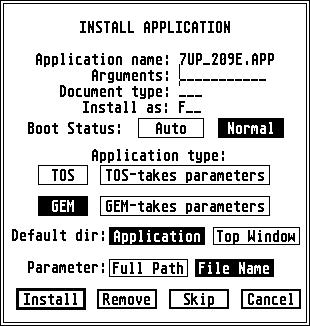
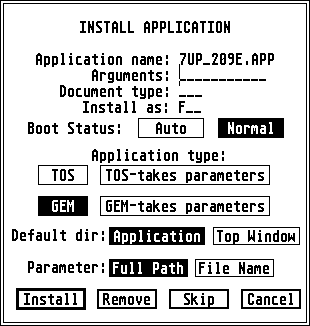
In the following example we've installed the ASCII text-editor "7up".
Default dir:
This is the directory where the program starts looking for its files (many programs have setup and resource (.RSC) files) and some of these programs are too "stupid" to know where to look for them. Other programs know where they're located regardless of the setting here. So it's hard to set a general rule for all software.
Be prepared to spend a little time experimenting with certain programs until you get it right.
- Application: The program will look for files within its own folder, which is usually where it'll find the files to begin with!
- Top Window: The program will look for its files in whichever window is "topped" (or currently "active") on the TOS 2.06 desktop. This is handy if you are working with files from the desktop (e.g. you have an open window with some text files you'd like to work with) as the file-selector within your text-editor will default to this folder every time you "open" or "save as".
Parameter:
The parameter defines how a file is sent to the program. This applies to the following situations:
- When a file is "dragged and dropped" on to the program's icon.
- When a file is double-clicked (as long as a program is installed to automatically open that document type).
(The parameter setting does not affect setup, resource (.RSC) or other files which the program needs in order to work properly. Their locations are defined by the program itself, or by the default directory setting).
The two possible parameter settings are:
- Full Path: The program is told the full path (e.g. F:\TEXT\README.TXT) of the file, giving the exact location regardless of where the program starts looking.
- File Name: The program is only told the name of the file (e.g. README.TXT) and nothing else.
This is fine if we happen to be inside that exact folder where the file is, but what happens if we're inside another folder, or even on a different drive? The program simply won't have any clue as to where the file is and won't find it.
Default directory/Parameter examples
There are 4 possible combinations of the "Default directory" and "Parameter" settings. The different settings give different results for different programs. Some of the more "intelligent" programs don't need to rely that much on these settings while others rely completely on them.
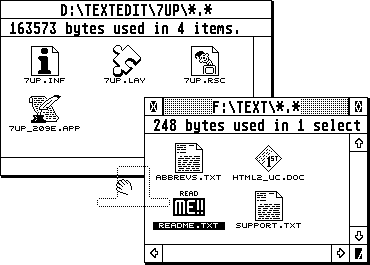
We'll take an example of the latter, where we will be using the ASCII text editor "7up" (version 2.09e) to open a text file named "README.TXT".
The program and the text file are located on two separate drives:
- The 7up folder (D:\TEXTEDIT\7UP\):
- 7UP_209E.APP (the program itself)
- 7UP.RSC (the resource file -essential!)
- 7UP.INF (the setup file -will work without it, but contains my favourite settings...)
- 7UP.LAY (the layout file -will work without it, but contains my favourite settings...)
- The text-file folder (F:\TEXT\):
- README.TXT
- In the examples below we will drag (and drop) README.TXT over to 7UP_209E.APP.
- The objective of course is to have 7up open up the text file and open (and use) all of its setup files, but as we will see, not all settings of "Default directory" and "Parameter" will allow for all of this...
Example 1
In this example 7up is installed with the following directory/path settings:
Default directory: Top window
Parameter : File name
- The default directory is the Top Window which is the window we have open on the desktop and contains the text file ("README.TXT"). So this file is found and opened.
- But 7up won't find its setup files ("7UP.INF" and "7UP.LAY" which are located in the same folder as the program itself) because it only looks inside the Top Window directory.
- The File Name parameter setting gives sufficient information for 7up to find the text file ("README.TXT") within the Top Window where it's told to look.
The setup files ("7UP.INF" and "7UP.LAY") still can't be found as the parameter settings don't apply for program-dependant files such as these. - Whenever we "Open" or "Save as..." a file within 7up, the file-selector defaults to the active (Top Window) folder on the desktop.
Example 2
In this example 7up is installed with the following directory/path settings:
Default directory: Top window
Parameter : Full path
- The default directory is the Top Window which is the window we have open on the desktop and contains the text file ("README.TXT"). So this file is found and opened.
- But 7up won't find its setup files ("7UP.INF" and "7UP.LAY" which are located in the same folder as the program itself) because it only looks inside the Top Window directory.
- The Full Path parameter setting gives sufficient information for 7up to find the text file ("README.TXT"). Actually it gives more information than necessary as 7up starts looking inside the Top Window folder, and only knowing the name of the file would suffice.
The setup files ("7UP.INF" and "7UP.LAY") still can't be found as the parameter settings don't apply for program-dependant files such as these. - Whenever we "Open" or "Save as..." a file within 7up, the file-selector defaults to the active (Top Window) folder on the desktop.
Example 3
In this example 7up is installed with the following directory/path settings:
Default directory: Application
Parameter : File name
- 7up's default directory is the Application folder which is where 7up itself is located, thus all needed setup files along with the program are found and used.
- The text file ("README.TXT") however isn't found.
- The File Name parameter setting prevents 7up from finding the text file ("README.TXT") because only the name ("README.TXT") is provided.
7up isn't given sufficient information about its location and only looks inside its own folder (Application directory) for the name of the file ("README.TXT") - Whenever we "Open" or "Save as..." a file within 7up, the file-selector defaults to the same folder as where 7up is found (Application directory).
Example 4
In this example 7up is installed with the following directory/path settings:
Default directory: Application
Parameter : Full path
- 7up's default directory is the Application folder which is where 7up itself is located, thus all needed setup files along with the program are found and used.
- The text file ("README.TXT") is found and opened.
- The Full Path parameter setting makes it possible for 7up to find the text file ("README.TXT") even though it only looks through its own folder (Application directory) to begin with. By supplying the entire path (F:\TEXT\README.TXT) 7up will know exactly where to find the file.
- Whenever we "Open" or "Save as..." a file within 7up, the file-selector defaults to the same folder as where 7up is found (Application directory).
Additional notes about default directories and windows
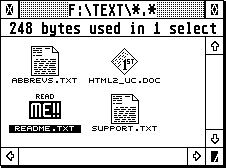
In all of the examples above, the text file ("README.TXT") is made available by having its directory window opened on the desktop.
If you find yourself working on the same file a lot it might be more convenient to make a shortcut of this file on the desktop, which is easily done by dragging the file's icon on to the desktop (nstead of having to open the file's directory window all the time).
From then on you can work with it in just the same way as you did before (when you had the file's own directory window open)....
- The file is "dragged and dropped" on to the program's icon.
- The file is double-clicked (as long as a program is installed to automatically open that document type).
As we will see, these same actions will give different results (when "Default directory" is set to Top Window) as this Top Window may now be a completely different one, or there may not even be any window open on the desktop at all!
When the Top Window on the desktop is different from where the file (e.g. "README.TXT") is located:
- With parameter set to File Name:
- The file ("README.TXT") isn't found and thus can't be opened by 7up because it's told to look only inside the current Top Window which is not where the text file on the desktop is located. The File Name parameter setting doesn't give 7up enough information to be able to locate it.
- Whenever we "Open" or "Save as..." a file within 7up, the file-selector defaults to the currently active (Top Window) folder on the desktop.
- With parameter set to Full Path:
- The file ("README.TXT") is found and opened by 7up as it now has sufficient information about its location (F:\TEXT\README.TXT), given the Full Path setting, despite the Top Window not being where the file is located.
- Whenever we "Open" or "Save as..." a file within 7up, the file-selector defaults to the currently active (Top Window) folder on the desktop.
When there are no open windows on the desktop at all:
- With parameter set to File Name:
- The file ("README.TXT") isn't found and thus can't be opened by 7up because it's told to look only inside the current Top Window which is not where the text file on the desktop is located. The File Name parameter setting doesn't give 7up enough information to be able to locate it.
- Whenever we "Open" or "Save as..." a file within 7up, the file-selector defaults to the same folder as where 7up is found (Application directory) as there is no longer any Top Window available.
- With parameter set to Full Path:
- The file ("README.TXT") is found and opened by 7up as it now has sufficient information about its location (F:\TEXT\README.TXT), given the Full Path setting, despite the Top Window not being where the file is located.
- Whenever we "Open" or "Save as..." a file within 7up, the file-selector defaults to the same folder as where 7up is found (Application directory) as there is no longer any Top Window available.
Installation parameters (for non-installed applications)
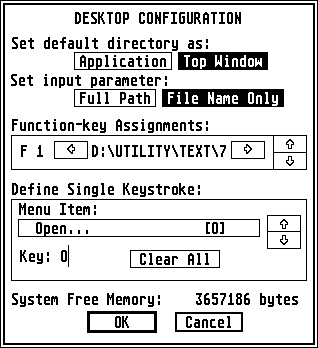
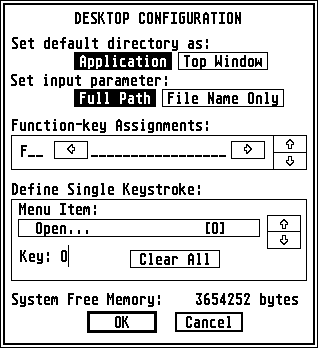
Go to the "Options" menu, then select "Desktop Configuration" which gives you the ability to configure certain global settings.
The settings in this window have been explained earlier in the sections about the "Options" menu, but we will now take a closer look at the following:
Set default directory as:
... and
Set input parameter:
These are the same two settings you'll find when installing an application (the "Options" menu). There are however a couple of differences and things to keep in mind:
- The settings here apply for any program which is NOT already installed.
- The settings here become the default settings whenever you install install a program (these can of course be changed for that program if you wish).
...... keeping this in mind, read the detailed explanation on how these parameters are used.
A configuration that works with all programs
The default settings (if you haven't changed anything yourself, or don't have a NEWDESK.INF file available) in Desktop Configuration concerning default director and parameter are as follows:
Default directory: Top window
Parameter : File name
....which works with most programs, but not everything.
Remember... the settings in "Desktop Configuration" found in the "Options" menu apply to any programs previously NOT installed, which in other words probably means the majority of all your software.
However, the following setting are guaranteed to work with any program:
Default directory: Application
Parameter : Full path
... so why didn't Atari use this setting as default in the first place?
An estimated guess is that by using "Top window" as the default directory, whenever you open the file-selector in a program (to open or save a file) it'll default to the same window you opened the file from on the desktop. Very practical for the user, but completely useless if the program won't find its files!
So to rectify any such problems you end up with two choices, depending on how the majority of your software prefers these settings to be and your choice in the matter:
- Go to Desktop Configuration and set it as follows:
Default directory: Application
Parameter : Full path- This'll ensure that all programs will find its needed files, but also that you'll lose the luxery of having the file-selector default to your active/top window contents each time you load/save a file.
Use this setting if the majority of your software doesn't work with the default settings, then for software that needs (or can work with) other settings (giving the mentioned advantage of the top/active window's default path) you just install those programs.
- This'll ensure that all programs will find its needed files, but also that you'll lose the luxery of having the file-selector default to your active/top window contents each time you load/save a file.
...or
- Leave the Desktop Configuration as it's set by default:
Default directory: Top window
Parameter : File name- Most modern software will work fine with these settings, and in addition give you the advantage of having the file-selector default to your top/active window whenever you try to open/save a file.
If the majority of your software works with these options then stick with it, and just install the few additional programs which don't. This is probably the overall best solution for most people.Also remember that each installation of a program takes up additional memory (especially related to saving the desktop), so you really don't want to install more programs than necessary, which is why you should choose the option which applies for the majority of your software.
- Most modern software will work fine with these settings, and in addition give you the advantage of having the file-selector default to your top/active window whenever you try to open/save a file.
