The "Options" menu
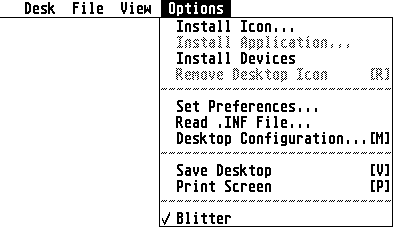
The "Options" menu lets you change the overall settings, install files and icons and save your system setup.
Install Icon
You can add an icon to any item in any window or the desktop
- All drives (hard disk, floppy, CD-ROM etc.), the trash-can as well as the printer can all have their own icons on the desktop.
- Any file, program or folder can have its very own unique icon.
- Files, programs or folders corresponding to certain names can all have the same type of icons.
- Any item on the desktop can be renamed with up to 12 characters including a mixture of upper/lower case, space and symbols (the Atari character set has many special symbols including the Atari logo!).
- In addition to the information below there's another section of this user-guide which teaches you all you need to know about organizing and creating/editing icons (along with tips, notes, limitations and workarounds).
- I've also created a "DESKICON.RSC" file (and a "NEWDESK.INF" with icon assignments for most files) so you can get started!
All relevant instructions are available in this user-guide as well as the files themselves.
Device icons (drives/trash/printer)
Here we will install (or change) icons for any of following items on the desktop:
- Drives (floppy disk drives, hard disk drives, CD-ROM or any other storage device)
- Trash can
- Printer
Device icons: installing an icon
- Go to the "Options" menu and select "Install Icon".
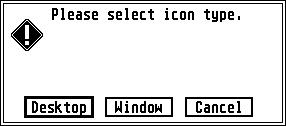
- Choose "Desktop" from the dialog window.
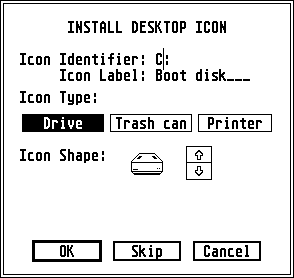
- Select the Icon type you want to add an icon for (Drive, Trash or Printer).
- Enter the icon identifier as follows (this only applies when installing drives):
- C, D, E etc. for a hard drive (depending on how many partitions you have).
- A or B for a floppy disk drive.
- c (NOTE: lower case letter) for a cartridge.
- Refer to separate installation software for CD-ROM drives, ZIP-drives etc. to find out which letter you enter here, as they usually rely on specialized driver software and can't be installed directly from the desktop.
- Enter the Icon label (name) of the drive, trash-can or printer (this is just for your own convenience so you can write anything you like here).
- Press the OK button when you're done. You should see the new icon on your desktop.
- Save the desktop.
Device icons: changing an icon
- Select the item (drive, trash or printer icon) you want to change by clicking on it once. The icon should invert to indicate that it has been selected.
- Go to the "Options" menu and select "Install Icon".
- Change the icon to what you like.
You can also change the Icon label (name) using up to 12 characters of any kind. - If the device is a drive you don't need to enter the icon identifier as it's already there.
- Press the OK button when you're done. You should see the newly changed icon for that device on your desktop.
- Save the desktop.
Device icons: removing an icon
- Select the item (drive, trash or printer icon) you want to remove by clicking on it once. The icon should invert to indicate that it has been selected.
- Go to the "Options" menu and select "Remove Desktop Icon".
- The icon should be removed from the desktop.
- Save the desktop.
or.... (The following only applies to drive icons)..
- Drag the drive icon to the trash can.
- You will be asked if you want to Remove just the icon (which is what we want) or
Delete all the files which that drive contains (which is NOT what we want!).
Be sure to press the correct button here as you can easily delete the entire contents of a drive (although you will be given a final warning first)!!!!
... as you can see from the dialog window, Remove is the default choice, so simply pressing <Return> (or <Enter>) will perform the task of removing the desktop icon.
- Save the desktop.
Icons for a single file or folder
In the following examples we will install a custom icon for a single file (such as a text-editor which you have a special icon for, representing only that program).
- Any file (including programs) or folder can have its own unique icon.
- The file can be dragged to the desktop (creating a shortcut) showing the same icon there.
- Once an icon is on the desktop it can be given a new name with up to 12 characters of any type.
Single item: installing an icon
- Select the file by clicking on it once (the icon should become inverted).
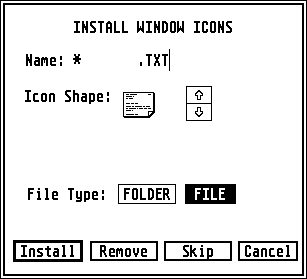
- Go to the "Options" menu and select "Install Icon".
- Choose the icon you want.
- Press the Install button.
- Save the desktop.
...or
- Go to the "Options" menu and select "Install Icon".
- Select "Window" from the dialog window.
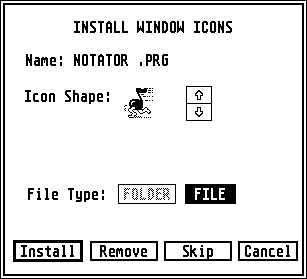
- For the Name, enter the exact name of the file as it's seen on your drive (e.g. EVEREST.PRG).
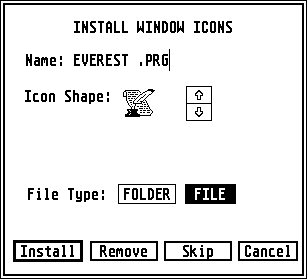
- Choose the icon you want.
- Check that the item setting (File or Folder) is correct for the type of item you're working with. (it's actually possible to use the same name (file-mask) for both files and folders. The two items, even though they use the same name-definition, have nothing to do with each other and are treated as two completely separate objects).
- Press the Install button. The new icon should appear.
- Save the desktop.
Single item: changing an icon
- Select the file, program or folder by clicking on it once (the icon should become inverted).
- Go to the "Options" menu and select "Install Icon".
- Choose the new icon you want.
- Press the Install button.
- Save the desktop.
or....
- Go to the "Options" menu and select "Install Icon".
- Select "Window" from the dialog window.
- For the Name, enter the exact name of the file as it's seen on your drive (e.g. CONNECT.PRG).
- Choose the new icon you want.
- Check that the item setting (File or Folder) is correct for the type of item you're working with. (files and folders are treated as two completely separate items, so even if they have the same name (file-mask), the icon-change will only affect one or the other).
- Press the Install button. The new icon should appear.
- Save the desktop.
Single item: removing an icon
- Select the file, program or folder by clicking on it once (the icon should become inverted).
- Go to the "Options" menu and select "Install Icon".
- Press the Remove button.
The icon will revert to whichever icon was used before. If no icon has previously been installed there will be nothing to remove, hence the following error message:
or...
- Go to the "Options" menu and select "Install Icon".
- Select "Window" from the dialog window.
- Check that the item setting (File or Folder) is correct for the type of item you're working with. (files and folders are treated as two completely separate items, so even if they have the same name (file-mask), the icon-change will only affect one or the other).
- For the Name, enter the exact name of the file as it's seen on your drive (e.g. EVEREST.PRG).
- Press the Remove button. If the name (file-mask) doesn't match anything you've installed earlier you'll get an error message. Try again, be sure to type the name of the file (or folder) exactly as you see it.
- Save the desktop.
Icons for multiple items
We will now install an icon for several files at once, meaning that for example all ASCII text files (they all end with .TXT) will have the same icon.
- Icons can be assigned to files or folders.
- Files (including programs) or folders matching the naming criteria will have the same icons.
- The file(s) can be dragged to the desktop (creating a shortcut) showing the same icon there.
- Once an icon is on the desktop it can be given a new name with up to 12 characters of any type.
Multiple items: installing an icon
- Go to the "Options" menu and select "Install Icon".
- Select "Window" from the dialog window.
- Choose if you want to add to add the icon to a File (which also includes programs) or a Folder.
- Set the Name (file-mask) for what the icon will represent.
- Use the "wildcard" character (*) which means "anything" to help match certain files.
- Use the "joker" character (?) to denote the amount of "any" characters in its place (each "?" means any character in its place).
- A few examples of file-naming and their results:
| Name | Will match |
| *.TXT | Any file ending with the ".TXT" extension (INFO.TXT, HELP_ME.TXT 12.TXT etc.) |
| *.WAV | Any file ending with the ".WAV" extension (ALERT.WAV, ABC.WAV, BELL.WAV etc.) |
| AT* | Any file starting with "AT", but has no extension (AT, ATARI, AT_HOME, ATTACK etc.) |
| READ*.* | Any file starting with "READ" and ends with any extension (READ, README, READ.NOW, READ_IT.1ST etc.) |
| SCRAP.* | Any file with the exact name of "SCRAP" and ends with any extension (SCRAP, SCRAP.TXT, SCRAP.IMG etc.) |
| SCRAP*.*? | Any file starting with "SCRAP" and ends with any extension (SCRAP, SCRAPFILE, SCRAPSTF.123, SCRAP.TXT etc.) |
| ????.* | Any file with any 4 characters (or less) with any ending (READ, READ.TXT, HIYA.AIF etc.). |
| RE*.?? | Any file starting with "RE" and ending with 2 characters (or less) (RE, REA, REA.ME, READ.ME, REX.AB, READ_ME.XY etc.). |
| *.* | Any file (makes no sense using: all files (and programs) will have the same icon!) |
- Choose the icon you want, then press the OK button.
- The examples above have been for files, but the exact same rules apply when installing icons for folders.
(Note: it's actually possible to use the same name (file-mask) for both files and folders. The two items, even though they use the same name-definition, have nothing to do with each other and are treated as two completely separate objects). - save the desktop.
Multiple items: changing an icon
Let's say we've previously installed an icon for all files ending with .TXT using the name (file-mask) "*.TXT" but now we want to use another icon instead...
- Go to the "Options" menu and select "Install Icon".
- Select "Window" from the dialog window.
- Go to "Install Icon" in the "Options" menu and select "Window".
- Choose File (which also includes programs) or Folder depending on what kind of item you want to change the icon for.
(In this example we will be using File).- (it's actually possible to use the same name (file-mask) for both files and folders. The two items, even though they use the same name-definition, have nothing to do with each other and are treated as two completely separate objects).
- Set the Name (file-mask) for the item you want to change ("*.TXT" in this example), making sure you enter the exact same name as you did when you installed it.
- Select the new icon you want to use.
- Press the Install button. If you have any open window with files matching your criteria you should see that the icons have now changed.
- If the name (file-mask) doesn't match exactly the same definition as you gave the files when you first installed them you won't get the icons replaced either. Instead, the new icon will now match the new definition you just entered.
In this case you should remove that new icon (if you can remember the name (file-mask) you just gave it). Alternatively you can reboot the machine and start all over again (if you haven't made too many other changes you'd rather not lose).
A useful tip: the "NEWDESK.INF" file is a plain ASCII text file which can be read simply by double-clicking it, or opening it in a text-editor. By looking through it (carefully if you're using a text-editor as you don't want to change anything!) you'll find all the file-masks previously used. Of course, if you made a file-mask but didn't save it this doesn't help as that particular file-mask is only in memory. Save the desktop, then look through "NEWDESK.INF" or (if you haven't made many other changes and can afford to lose them) reboot the computer and start over again.
- If the name (file-mask) doesn't match exactly the same definition as you gave the files when you first installed them you won't get the icons replaced either. Instead, the new icon will now match the new definition you just entered.
- Save the desktop.
Multiple items: removing an icon
...we've decided that we no longer want a custom icon representing all ".SND" files and want to remove the icon assignment for this type of file (remembering that we used "*.SND" as the name (file-mask) when we installed it).
- Go to the "Options" menu and select "Install Icon".
- Select "Window" from the dialog window.
- Choose File (which also includes programs) or Folder depending on what kind of item you want the icon removed from.
(In this example we will be using File).
(it's actually possible to use the same name (file-mask) for both files and folders. The two items, even though they use the same name-definition, have nothing to do with each other and are treated as two completely separate objects). - Set the Name (file-mask) for the item you want to change ("*.SND" in this example), making sure you enter the exact same name as you did when you installed it.
- Press the Remove button.
If the name (file-mask) doesn't match anything you've installed earlier you'll get the following error message meaning that you've never used this file-mask before:
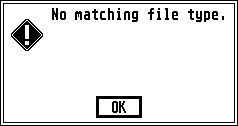
...you may have gotten the name slightly wrong as the exact syntax is often hard to remember.
Try again (but be sure not to affect another file-mask which you've used for entirely different files). Actually, the following might be of
more help if you're confused and don't want to mess things up...
The "NEWDESK.INF" file is a plain ASCII text file which
can be read simply by double-clicking it, or opening it in a text-editor. By looking through it (carefully if you're using a text-editor as
you don't want to change anything!) you'll find all the file-masks previously used. Of course, if you made a file-mask but didn't save it
this doesn't help as that particular file-mask is only in memory. Save the desktop, then look through "NEWDESK.INF" or (if you haven't made
many other changes and can afford to lose them) reboot the computer and start over again.
- Save the desktop.
Desktop icons
Any program, file or folder can have its icon on the desktop. Double-clicking this icon will have the same effect as double-clicking it at its original location (on the floppy/hard disk drive) in a window...
Desktop icons: installing an icon
- Open a window containing the file, program or folder.
- Drag that item over to the desktop. This will create a shortcut to the actual item on your drive.
- Save the desktop.
Desktop icons: changing an icon
- Select the item you want to change by clicking on it once. The icon should invert to indicate that it has been selected.
- Go to the "Options" menu and select "Install Icon".
- Change the icon to what you like.
You can also change the Icon label (name) using up to 12 characters of any kind. - Press the OK button when you're done. You should see the newly changed icon for that device on your desktop.
- Save the desktop.
Desktop icons: removing an icon
- Select the item you want to remove by clicking on it once. The icon should invert to indicate that it has been selected.
- Go to the "Options" menu and select "Remove Desktop Icon".
- The icon should be removed from the desktop.
- Save the desktop.
or.... (The following only applies to drive icons)..
- Drag the desktop icon to the trash can.
- You will be asked if you want to Remove just the icon (which is what we want) or
Delete all the files which that drive contains (which is NOT what we want!).
Be sure to press the correct button here as you can easily delete the file/program/folder from the drive!!!
... as you can see from the dialog window, Remove is the default choice, so simply pressing <Return> (or <Enter> will perform the task of removing the desktop icon.
- Save the desktop.
Desktop/window icons: a summary
We have now covered the different ways of installing, changing and removing any kind of icon...
The actual placement of any icon can be...
- In a drive's (floppy disk, hard disk, CD-ROM etc.) window.
- A specific file or folder can have its own unique custom icon.
- Files or folders matching a pre-defining naming criteria can have the same icon.
- On the desktop.
- Alias/shortcut from the actual file location on the drive.
- Files or folders dragged from the drive's window(s) will have the same icons as in the windows.
- Any icon on the desktop can have its icon changed individually from that of the window's.
- Several copies of the same file can be placed on the desktop, each with its own icon.
- Icons can be removed from the desktop without affecting the actual file on the drive.
- Icons can be removed from the desktop AND deleted from the drive at once.
- Any icon on the desktop can be renamed using up to 12 characters which includes upper/lower characters, spaces and special symbols. This renaming does not affect the actual file on the drive.
- If several copies of the same file are found on the desktop, each one can have its own name, not affecting the others (again up to 12 characters etc.).
Some notes about window icons
In addition to all of the above there are some additional things about window icons not previously mentioned...
- If you have several copies of the same file (e.g. INTERFACE.PRG) on your drive (i.e. inside different folders)...
..in case you change the icon for one of these, then all of the items carrying the same name and being of the same type (file or folder) will end up with the same icon as well! - Icon names (file-masks) matching other previously assigned names (file-masks) will replace those other icons with whatever icon has been assigned. For example:
- The name (file-mask): SCRAP.* is installed with a clipboard icon
- Another name (file-mask): SCRAP*.* is installed with a "crumbled paper" icon.
- The result of the above is that any file starting with SCRAP and ending with anything will have the "crumbled paper" icon, because SCRAP*.* replaces the previous file-mask (SCRAP.*).
- If you remove the SCRAP*.* icon, the previously used icon for SCRAP.* will return!
(the order of the file-masks (names) are important here. Read more about this in detail by going to Atari TOS desktop survival kit).
Some notes about desktop icons
Here are a few things to keep in mind when dealing with desktop icons...
- Any item (file, program or folder) can be dragged to the desktop.
The desktop icon will be an alias, shortcut, or a representation if you wish, of the actual file. - You might for example find it a lot more practical to simply start a program you use frequently by double-clicking it on the desktop rather than having to go through lots of folders first.
- Having a program's icon on the desktop is also practical for "drag & drop" purposes where you can drag a file from a window over to the program's icon and drop it there (which will (if the program supports "drag & drop") open up the file in that program).
This can of course be done between the file's and the program's windows, but you may have to spend some time resizing the windows etc. - If a file is dragged to the desktop, it will have the same icon as it had in the window.
- If the window's icon is changed after the desktop icon has been placed, only the window's icon will change. The desktop icon will stay the same.
To make the desktop icon the same as the window's icon in this case you can:- (1) Drag the desktop icon to the trash-can, and choose "Remove", then...
(2) Drag the file from the drive's window to the dektop again. or... - (1) Click on the desktop icon once to select it (the icon will invert).
(2) Go to the "Options" menu and select "Install Icon".
(3) Change the icon to the same one as used in the window
(4) Press the OK button when done. The new icon will become present on the desktop.
- (1) Drag the desktop icon to the trash-can, and choose "Remove", then...
- You need to Save the desktop to keep any information about desktop icons till the next time you use the computer (or after rebooting).
- When a program is installed from the desktop, the installation affects the program itself, and you will of course get the exact same options whether you double-click it from the desktop or from the window wher the file is actually located.
Install Application...
Programs can be installed with various options specific to only that program.
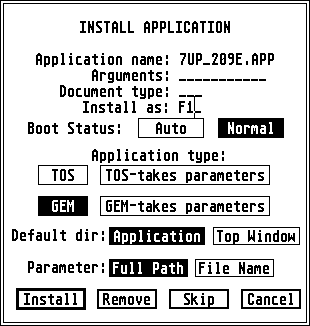
- To install a program, select it by clicking on it once, then go to "Install Application" in the "Options" menu, change the settings if needed, then press the "Install" button.
- To remove a program, repeat the procedure as above, but this time press the "Remove" button in the dialog. This will remove all the settings for that program.
- You can also change the settings of an already installed program simply by selecting it, going to "Install Application", changing whatever you want, then pressing the "Install" button again.
The Installation parameters are as follows:
- Arguments: If the program accepts command line options (such as a .TTP program) you can enter it here.
An example would be the .ZIP decompression program "ZIPJR.TTP" where you'd enter: "-xrg " here. More about arguments later. - Document type: You can enter the type of file which the program should open if double-clicked.
For example, if you enter "ZIP" here, any .ZIP file double-clicked would start that program and open the file. Another example would be for a graphic program to be started each time a ".IMG" file is double-clicked.
You're only allowed to enter one extension here, but by manipulating "NEWDESK.INF" (the TOS 2.06 desktop setup file) you can have a program recognize several file-extensions (e.g. a graphic program recognizing several different graphic file formats). - Install as: Any one of the 10 "function keys" (F1 to F10) can be assigned to start a program.
No more wasting time digging through folders. Useful for programs you find yourself using often (you might of course already have a desktop icon for that program, but if you don't want to clutter up the desktop with icons, or even just want quickly hit an F-key instead of needing to double-click on an icon, this is the way to go!). Enter the number of the F-key here. - Boot Status:
- Auto: If you find yourself always starting a specific program every time you start using the computer you can have it automatically started each time!
This can be useful in situations where you use the computer for only one program (e.g. a word-processor, desktop-publisher or MIDI application is used every time you turn on the machine), or an alternative desktop such as "Thing" or "Jinnee". - Normal: This is the normal setting where a program has to be started by double-clicking on it in a window, or on the desktop if you've got an icon for it there (or using an F-key if you've assigned one to it).
- Auto: If you find yourself always starting a specific program every time you start using the computer you can have it automatically started each time!
- Application type: TOS looks at the file extension (3 character "last name") of the program you're installing and determines what type it is. If for some reason you want to force TOS into recognizing it as something else you have the chance here. For example forcing a GEM or TOS application to accept a command line option. You'll usually leave these settings as they are.
- TOS: a program with the ".TOS" extension.
- TOS-takes parameters: a program with the ".TTP" extension.
- GEM: a program with the ".PRG" or ".APP" extension.
- GEM-takes parameters: a program with the ".GTP" extension.
- Default dir: This refers to where a program will look for files and work with them if necessary.
(click here for a more detailed explanation).- Application: With this setting the program will start looking for files within the same folder as the program itself.
- Top Window: Here the program will start looking for files within the "top" (or currently "active") window on the desktop.
- Application: With this setting the program will start looking for files within the same folder as the program itself.
- Parameter: This setting defines how a file is sent to the program.
(click here for a more detailed explanation).- Full Path: The full path (e.g. D:\TEXT\INFO\HELP.TXT) of a file is sent to the program.
- File Name: Only the file name (HELP.TXT) is sent to the program.
Install Devices
- This will "mount" and add icons for any disk drive, hard disk, CD-ROM etc. if there isn't already an icon for it on the desktop (if you've been using a different "NEWDESK.INF" file with a different setup where different (or none) of the current drives were attached) you will need to install them using this function.
- It will also remove any drives that are not currently in use (e.g. you're using a "NEWDESK.INF" type setup file with external drives attached, which are not currently attached or turned on).
- You can change the name and icon of any drive.
Remove Desktop Icon
- If you select an icon on the desktop by clicking on it once, you can use this to remove the icon (but not deleting the file itself) from the desktop.
- This is the same as dragging an icon to the trash can, except you won't be asked if you want to remove the icon or delete the file (and harder to make a mistake of deleting the entire contents of a drive!).
- You can also remove an unwanted drive icon (e.g. floppy disk drive "B") from the desktop by clicking it once (to select it), then going to "Remove Desktop Icon".
Set Preferences...
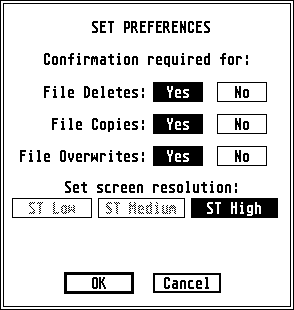
Various general settings for the computer..
- Confirmation required for:
- File Deletes: If this is set to "Yes", you will be asked if you really want to delete the selected file(s)/folder(s). You then have to click on "OK" or "Cancel".
You can set this to "No" if you know exactly what you're doing and want to save time by not confirming each file delete. Be careful with this one as it's very easy to delete things by accident!
(This includes dragging a window's icon to the trash, forgetting that you're not dealing with a desktop icon which you can remove from the desktop. The result being that you delete the file from your drive!.
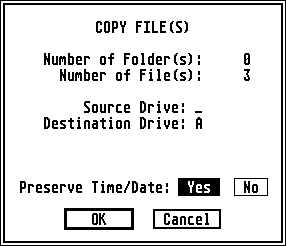
If you have the above option turned on you will at least get a chance to change your mind). - File Copies: If set to "Yes" you will be asked if you really want to copy the selected files or not.
If set to "No" the files will be copied right away.
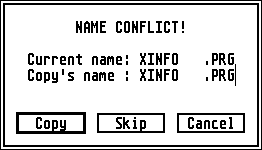
Also, if turned on, when you copy files you can (with the help of the dialog window that pops up) you can also choose if the file should be copied with the existing date (the date the file was created), or update the copy with the present time/date. - File Overwrites: If this is set to "Yes" you will be asked if an existing file should be replaced (overwritten) or not before actually doing it.
If set to "No" it will overwrite the file right away.
Be careful with this one as you may easily lose a file's original contents if you're not careful!
I personally see no good reason for having this switched off as people usually don't want to copy a file over the same file again, with the same name, which is what can be done if this turned off. At least when turned on you'll get a warning and be asked for a new file name.
- File Deletes: If this is set to "Yes", you will be asked if you really want to delete the selected file(s)/folder(s). You then have to click on "OK" or "Cancel".
| If confirmation is turned on for copying files, you can choose to give the copy the same date as the original file, or the current time and date. |
If confirmation for file overwrites is turned on you will be warned if you try to copy over an existing file with that same name, and you can rename the copy to something else. |

With confirmation turned on for file deletes you get a chance
to press the "Cancel" button if you change your mind.
Set screen resolution:
- ST Low: If you have a colour monitor, TV or multisync monitor set to colour-mode you can select the lowest resolution (320x200/16 colours).
This option is "greyed out" (unselectable) if you have a black/white high-resolution monitor. - ST Medium: If you have a colour monitor, TV or multisync monitor set to colour-mode you can select the medium resolution (640x200/4 colours).
This option is "greyed out" (unselectable) if you have a black/white high-resolution monitor. - ST High: If you have a high-resolution black/white monitor or a multisync monitor set to black/white-mode, this option is selected.
This option is "greyed out" (unselectable) if you have a colour monitor, TV or multisync monitor set to colour-mode.
Read .INF File...
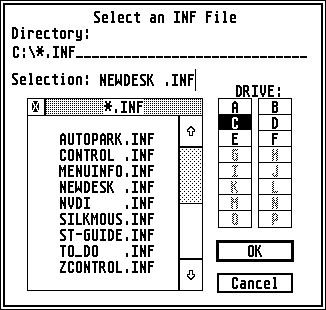
TOS 2.06 allows you to Save the desktop setup ("NEWDESK.INF") file which can be renamed, making place for another (different) setup file. You can at any time read any of these files for a choice of different desktop configurations.
- Note that the computer looks for the file name "NEWDESK.INF" when booting (starting up) and is automatically loaded into memory if available. If you want to use a different setup file you have to rename it first.
- TOS 2.06 can read the old style "DESKTOP.INF" file created with TOS versions prior to version 2.06.
These files can however cause problems with TOS 2.06.
....so, if you have a "DESKTOP.INF" file, delete it, reboot (restart) the computer, then save the desktop (creating a fresh "NEWDESK.INF" file instead). - If you want an really quick way of reading a new setup file... how about simply double-clicking any of those .INF files?
- Get hold of either "Load-INF" or "Desk-Switch"
- Install the program to handle INF files (document type).
- Save the desktop.
- From now on, just double-click any .INF file, and that setup file will be loaded into memory.
- Use the first setup file (the one you installed the .INF file loader program in) as a template for making new .INF files. That way they'll all know what to do when you double-click a .INF file!
- If you use a boot-selector (such as "SuperBoot") you can configure different setups to contain different "NEWDESK.INF" files. This will fully automate your different setups, and you can choose which one you want together with your choice of AUTO programs and ACCessories simply by pressing one key when booting (starting up)!
Desktop Configuration...
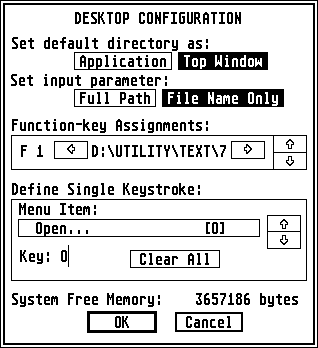
You can change various general settings for the desktop here.
- Set default directory as: This refers to where a program will look for files and work with them if necessary. The setting here is what any application NOT currently installed will use. Furthermore, when installing an application, the settings here will be reflected as the defaults (which can of course be changed for that program).
- Application: With this setting the program will start looking for files within the same folder as the program itself.
- Top Window: Here the program will start looking for files within the "top" (or currently "active") window on the desktop (This is the default setting when no "NEWDESK.INF" file has been loaded, or no changes have been made to this setting).
- Set input parameter: This setting defines how a file is sent to the program. Like the "Set Default Directory" setting above, this setting is also found when installing a program (the "Install Application" menu).
The setting here is what any application NOT currently installed will use. Furthermore, when installing an application, the settings here will be reflected as the defaults (which can of course be changed for that program).- Full Path: The full path (e.g. D:\TEXT\INFO\HELP.TXT) of a file is sent to the program.
- File Name Only: Only the file name (HELP.TXT) is sent to the program (This is the default setting when no "NEWDESK.INF" file has been loaded, or no changes have been made to this setting). (read a more detailed explanation of the "default directory" and "input parameter" settings to find out exactly how they're used).
- Function-key Assignments: An overview over programs assigned to F-keys and their paths. Click on the up/down arrows to scroll through the assigned programs.
Note that you can't actually change/remove any F-key assignments here, although it'll help you determine which programs are defined this way and where they're located.
To add, change or remove an F-key assignment you need to go to the install Application menu. - Define Single Keystroke: This section deals with keyboard shortcuts for the various desktop functions.
- Menu Item: Click on the up/down arrows to see the various commands and their keyboard shortcuts.
- Key: which keyboard shortcut is assigned to each function.
- Shortcuts for any of the window menu items can be changed.
- If you don't want a shortcut for a certain menu item (e.g. "Delete Item", (making it harder to accidently delete things since you could only do it by selecting the menu with the mouse) you can remove it for that menu item).
- The shortcut letter for any menu item (if used) is shown on the right hand side of it within two brackets (e.g. [L])...
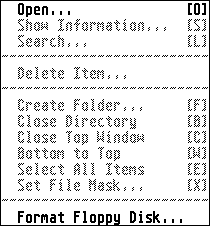
- Scroll through the various menu items and see which letter has been pre-assigned. When you find an item you want to change, simply press the keyboard letter you want it to use instead, then scroll to the next menu item. Upper/lower case lettering is insignificant. If you entered a lower-case letter (i.e. without using <Shift> together with it), scroll back to that menu item and you'll notice that it has been changed to upper case anyway).
- If you don't want a shortcut for a specific menu item, simply press the <Backspace> key. Be very careful not to press the <Space> bar or other characters not being shown in the menu. Just because you don't see it doesn't mean it's not there! If you press the <Backspace> key you will notice that the cursor will be seen all the way to the left, indicating that it's empty. Another way to see that it's empty is by looking up the drop-down menus. If you've used an invisible character the shortcut will still be shown as follows: [ ].
- If you don't want any shortcuts at all (or want to start from scratch) press Clear All. Keep in mind that there is no way to recall these settings unless you re-read the NEWDESK.INF file (unless you've saved the new settings in the meantime). If you want to use the default settings you have to remove (or disable) "NEWDESK.INF", then reboot (restart) the computer.
If you don't want to lose the other settings (i.e. icon assignments, program installs, window placements and everything else stored in the "NEWDESK.INF" file) you have to manually enter the shortcuts for each menu item. The defaults (e.g. the shortcuts Atari set up to begin with) are as follows (note: Atari didn't create a shortcut for every single menu item):
| Menu | Menu Item | Shortcut letter |
| File | Open... | O |
| File | Show Information... | S |
| File | Search... | L |
| File | Create Folder... | F |
| File | Close Directory | B |
| File | Close Top Window | C |
| File | Bottom To Top | W |
| File | Select All Items | E |
| File | Set File Mask... | X |
| Options | Remove Desktop Icon | R |
| Options | Desktop Configuration... | M |
| Options | Save Desktop | V |
| Options | Print Screen | P |
- As explained in the Atari TOS desktop survival kit you can actually change the keyboard shortcuts to include the <Control> key which opens up a whole new world! If you've been using PCs etc. you've no doubt noticed that keyboard shortcuts are pretty standardized these days. How about making TOS 2.06 accept the same shortcuts?
- Simply press (and hold) <Control> while pressing the letter you want to combine it with, such as <Control> and <O>.
- Note that when using <Control> key combinations, other TOS shortcuts involving <Control> (such as the file/window shortcuts will no longer work for that key (such as <Control>' and <F> which would previously replace the contents of the currently active window with the contents of drive F) will now do a file-search instead. However, for shortcuts you haven't used (e.g. <Control>'<D>: these will still be used by the system (in this case opening the contents of drive D in the active window on the desktop).
- Also note that the new shortcuts will have very strange abbreviations which can't be understood simply by looking at them. However, by using more standardized abbreviations, chances are you'll more likely to remember them (which is probably why you want to change them in the first place).
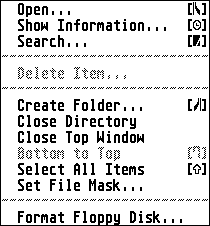
...in case you want to go ahead and change the shortcuts to something more standard as what PCs and other computers (or even the alternative desktops for the Atari ST) use, here are some of the most common ones.
(e.g. <Control><O> meaning: press (and keep holding) <Control> while pressing O)....
| Menu | Menu Item | Standardized shortcut/explanation |
| File | Open... | <Control><O>(Open file) |
| File | Show Information... | <Control>(Information) |
| File | Search... | <Control><F>(Find file) |
| File | Create Folder... | <Control><N>(New item) |
| File | Bottom To Top | <Control><W>(Window) |
| File | Select All Items | <Control><A>(All items) |
| Options | Save Desktop | <Control> |
| Options | Print Screen | <Control> (Print) |
- Note that there aren't standard shortcuts for all the functions available on the TOS 2.06 desktop. If you want you can even combine single-lettered shortcuts for some menu items along with standard (<Control> key) shortcuts for other items -the best of both worlds!
- In addition to single letters and <Control> key combinations you can also use some of the special keys (<Esc>, <Tab>, <Return>, <Enter> <Backspace> and <Delete>) for your shortcuts (these have to be entered using the <Alternate> key together with their decimal equivalents).
Do however keep in mind that this is not such a good idea as it's easy to press these single keys and create a total mess without even knowing about it. Besides, they're usually very common keys used for a variety of other functions. But again it's up to you...
- In addition to single letters and <Control> key combinations you can also use some of the special keys (<Esc>, <Tab>, <Return>, <Enter> <Backspace> and <Delete>) for your shortcuts (these have to be entered using the <Alternate> key together with their decimal equivalents).
- System Free Memory: How much memory (RAM) the computer has currently available. Keep in mind that accessories, AUTO programs, icons etc. all take up memory. If you find that you could need more memory (and the computer is already expanded to its maximum) you might want to remove or disable anything which isn't totally necessary.
Save Desktop
- Save all the current settings related to the TOS 2.06 desktop (icon assignments, desktop/window colours, desktop icon names, installed programs etc.).
- The desktop is saved as "NEWDESK.INF" on the root (not inside any folder) of the boot disk (usually drive "C" on a hard disk system), or on the root of a floppy disk.
- Whenever you make a few changes to the desktop (install programs, add icons etc.) make a habit of saving the desktop.
Don't wait until you're finished with everything. In case the computer crashes for some reason (even if the computer doesn't crash there are nasty things like power-loss, blown fuses etc.) you'll only lose whatever changes you made since you last saved the desktop.
This is actually a good rule for computer use in general!
Save your work as you go along, and make backups.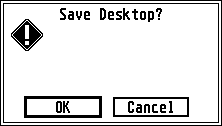
- After the "NEWDESK.INF" file has been saved you can rename it to something else (but remember to keep the ".INF" ending or else it won't show up in the file-selector when using the "Read .INF file" menu) and have several setups available.
(Unfortunately there is no way to save the current setup under a different name than "NEWDESK.INF"). - The various desktop setups can be loaded by going to the "Read .INF File" menu.
However, if "NEWDESK.INF" is available, that file will be loaded automatically each time the computer is turned on/rebooted. - Have different setup files ready for different situations/uses of the computer:
- Extra drive icons on the desktop when an additional hard disk is being used.
- Different set of icons for different program uses (e.g. lots of MIDI related programs whenever you're using the computer for making music).
- Several users of the same machine may want custom setups for him/her.
- Different cosmetic layouts (e.g. other background patterns/colours) for a change. ... and the list goes on.
Having different setups to choose from will probably save you lots of memory for the "NEWDESK.INF" file as you won't have to configure everything for every possible situation in one file!
- Create a folder on the boot-drive (usually drive C on a hard disk) where you keep all your desktop setup files. This will keep things neat and tidy, and you don't have to search everywhere to find the setup of your choice.
- There is a limitation to how big "NEWDESK.INF" can be. The maximum size is 4 Kbytes (4096 bytes) The Atari TOS desktop survival kit states that you will start getting into trouble as soon as you pass 3900 bytes. My personal experience however has been that I've been able to save the file at a size of 4188 bytes.
By adding even more information (additional icons on the desktop etc.) I got an error message preventing me from saving the file again...
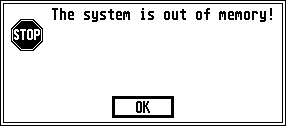
(To solve the problem I removed an icon or deinstalled a program I didn't need, then tried to save again).
- Each time you install a program, add an icon, open a window etc. you will use up some memory. Here are a few tips on how to make the most out of those 4 Kbytes:
- If you run out of memory (and you get an error message as the one shown above, preventing you from saving the desktop), try to remove anything unnecessary (e.g. a desktop icon, deinstall a program you're not using etc.) and try saving again. Repeat if necessary.
- Don't try to install every single program you have. It's probably not necessary as you may not even use all those programs and it takes up a lot of memory.
- Don't install a custom icon for every single file/folder. Instead, install icons matching several items in one go (e.g. all .TXT files get the same icon etc.). A nice side-effect is that any new files of the same type will also get an appropriate icon!
- Don't clutter the desktop with too many icons. Besides taking up memory, too many icons will just look confusing (and you'll probably want some space left for any open windows).
- If you find yourself using many of the same programs/files residing within the same folder, drag that folder to the desktop!
This will save the amount of icons on the desktop (and memory), and still give you quick access to those files.
- It's possibly to bypass this 4 Kbyte limitation in TOS 2.06 by using Shbuf, but may not be applicable to everybody as it uses up additional memory (TOS needs to be copied into RAM etc.).
Print Screen
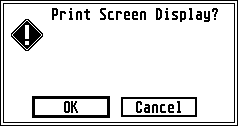
- This will allow you to print a complete picture of the desktop (e.g. all the icons and everything else on the dekstop as you see it).
- You can also use the key combination <ALTERNATE> and <HELP>.
(Note that some screen-dump programs replace this keyboard combination so that the desktop is saved to a file as a picture file instead of being printed, such as "N_AltHelp"). - Go to the "printer" CPX-module to configure the printer settings.
(Note: The printing options of TOS 2.06 are pretty limited, so read my tips on printing for a summary along with useful tips).
Blitter
If a "Blitter" (Block Image Transfer) chip is present in your machine you can turn this on to make screen updates a lot faster.
This option is "greyed out" (unselectable) if your machine doesn't have a Blitter chip. Atari STe and Mega STe computers come with Blitter chips already pre-installed.
